
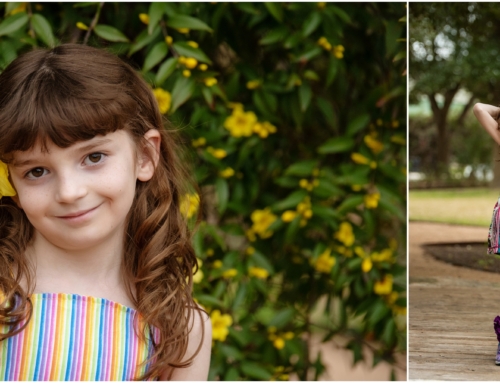
It’s been awhile since I posted something like this and I thought it was about time. Not sure how helpful it will be, but I took a few setup shots when I was over at MC’s photographing baby Tommy recently. MC had several requests for his newborn photos, one being that she wanted some of them earthy, natural and that they have a lot of texture. Finding green in the massive heatwave that is Texas right now is tough, but we did it, and with high sun! These were shot maybe around 2 pm in the afternoon, but on a large covered porch. The light was good and bright so I was able to put his back to the light coming in and catch just enough of the green bushes behind him. Here is the setup straight out of camera….

If he was a girl, I would have utilized the pink flowers and positioned him more to the right. The basket is filled with other blankets and I think a boppy was in there too to get him to the desired height. The front of the house is camera left and I put the basket close to the bushes for several reasons. First, so I could have enough room to shoot and secondly, because if I brought him out from the bushes, I would have caught both my vehicle and the street in the background and bokeh. Also, when posing the baby, start with the feet and place them where you want them first. Then set down the bottom and gently bend the baby forward into place. Don’t be afraid to pick up the babies head and gently turn it directly toward you so that the side of his/her face is flat against the blanket/surface. You want to be able to see all of the eye up against the blanket and even the slightest tilt can make it appear as though the baby is looking down. Their necks are flexible, they don’t mind. Here are three resulting shots from this one setup….

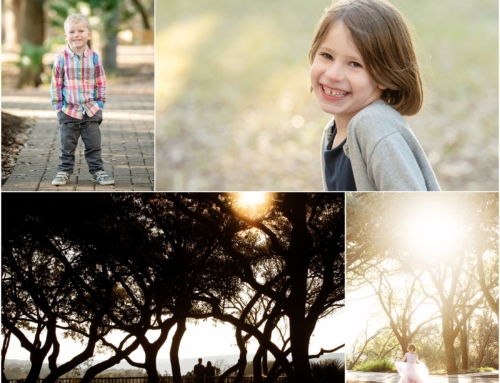
I love the bokeh in this shot. And his little chompin’ big toe. If you read comments here often, you know MC is a toe chomper.
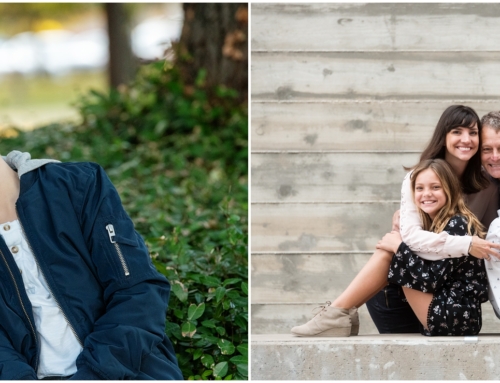
And a verticle one for good measure. Even though I love the horizontal shot above, when shooting for clients it’s a good idea to offer it both ways. What if their wall or frames call for a verticle? Some people choose to crop when shooting and some people don’t. It’s possible you could crop one image two different ways, it just depends on your shooting style. My point is, options are good.

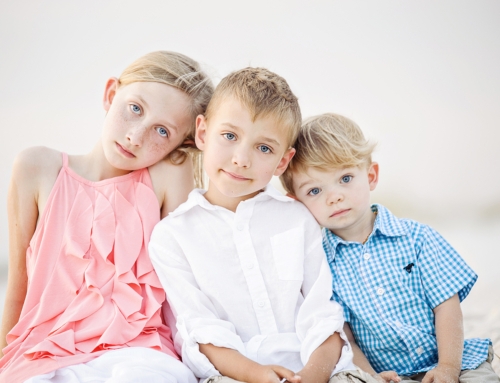
After I took this shot I decided to rearrange him a bit (actually took that first one afterwards but you get the point). I wanted to move his leg to the outside and his arms in so that I could see more of where the toes were coming from. You can see in the shot below that this pose is more effective just by switching the placement of the arm and leg. My goal was to get his little hand outstretched up on his cheek, but he wanted none of it. He’s very much a clenched fist baby, so we rolled with it. I think this one is my favorite. I think because it’s a full body shot, he’s bendy, has chompin’ toes and you get lots of texture, green, the basket and blanket, etc. I would love to see this one on canvas.

These posts always seem weird to me because I’m not sure if it helps anyone, but I thought I’d post in anyway! Feel free to post any questions in the comments =)
And with that, I’m off to photograph baby Jack in a big open field at sunset! Later!!
I love posts with helpful hints! This was a great post and very helpful – thanks!!! Not to mention that the baby is adorable and a great subject 🙂
This is fantastic – thanks SO MUCH for sharing your setup!! It is extremely helpful to see how you positioned baby and hear the details on how and why you posed him that way. That is a HUGE basket – how many blankets do you have in there to get him at that height?
I, for one, love these posts! I don’t normally photograph babies, but I love them. It’s always fun to see how other photographers work with what they have.
Also? This kid could not be any more precious!
Thank you so much for sharing this type of post. It is a HUGE help to those of us new to the newborn sessions. Thank you for sharing your knowledge with us.
So, L, the first shot is the one you used and then you just cropped in PS to get close?
oh, wait…maybe not? Just wondering if I crop in camera too much…
1. seeing you position him feet first was huge. i had never really “gotten” that.
2. note to self, trim hedges out front before Lyndsay comes over in case she shows the world a SOOC shot.
3. I am totally using the “I was pregnant and my husband wasn’t able to do it.” excuse for #2 not being done.
4. These shots are some of my faves.
wow, this was an awesome post, thanks for all the input:)
You are always helpful! Thank you for posts like these 🙂
I LOVE these posts!!!!!! My question … do you fill the frame in your camera or do you crop?
Bernice – I think there were 3 blankets plus a boppy and then the blanket on top (which happens to be MC’s and was a wedding gift so it has meaning to them!)
MC you crack me up!
Michele – nope, I just pulled back for one shot to show the setup. Each of these was a different capture and I was positioned more at his level on the ground.
Heather – I used to strictly crop in camera. When I bought my first full sensor camera I forced myself to stop cropping in camera. There were several times when I needed extra space around the edges for gallery wraps or different crops while printing. I managed to change my ways and now no longer crop in camera for the most part.
i love this FYI post! thanks for sharing.
Really and truly helpful!!! Thanks so much!!! Here’s my next question: How do you get those newborn poses where their head is more upright, “leaning” on their hands? Do you know what I mean? Check this out for reference: http://www.amandaandrewsphotography.com/blog/?p=466
I put a comment in to her but so far no answer… This pose and ones like it are my TRUE challenge!!! HELP!!! 🙂 Yours is the blog I most frequent. Thank you for your constant inspiration!!!
I love posts like this because it is soooo helpful to those like me who are learning or want to learn. I will check back often! What lense were you using?
Really really helpful.
When photographing more than one person to get all of the them in focus are you using a slightly higher aperture like 5, but still low enough to have the background slightly out of focus?
Christine, I’ve never attempted that pose before.
Janie, I was using my 50 mm 1.2 on my 5DMarkII. You can see my original 5D with my 24-70 on the ground in the corner on the pulled back shot.
MGF – it depends. If the subjects are on the same plane then your ap can be lower (but 5 is a good go to number to start with). The biggest thing to remember with this, is that it isn’t ONLY your ap, or if they are on the same plane, but how far from the subjects YOU are makes a huge difference too. The closer you are to the subjects, the more DOF you will get. Here is a good depth of focus calculator: http://www.dofmaster.com/dofjs.html
Love behind the scenes shots and explanations. Totally makes sense to poses the baby feet first, always struggle to get the baby all tucked up like that.
Thanks for sharing!!
Beautiful and the last shot is by far my favorite because of all the different elements. 🙂 Neat insight on the process too.
Oh, THANK YOU for these kind of posts, I really appreciate them and learn something new from you every time. Did you shoot wide open?
For Christine: I saw a video on youtube about posing like that, you focus your camera and get ready, then step by step bring baby to this position, have somebody else hold and then let go, the baby goes to the side right away, but you gotta click fast and catch it. Hope that helps
Love it, adorable pictures! Your info is awesome thanks so much.
gorgeous as always. thanks for taking us along. 🙂 your pose is so perfect with those toes.
Thank you for sharing this. These posts are very helpful and very appreciated.
Very helpful! I love posts like this!
These posts are INCREDIBLY helpful. I do have one question for you. You talk about cropping in this post – how do you crop your images for your clients? Do you crop them all to a certain size and then print them in whatever size they want? or do you crop them after you find out what sizes they want?
Hmm…that was more than one quesstion – sorry!
Not weird at all!! 🙂 Thank you so much for sharing these tips… very helpful and insightful! Keep ’em comin’!
as someone who is just learning, i really appreciate the post. it will be helpful when i go see my brand new nephew in a couple of weeks and take some pics. thanks for the help!
as someone who is just learning, i really appreciate the post. it will be helpful when i go see my brand new nephew in a couple of weeks and take some pics. thanks for the help!
LOVE these pictures…and YES!!! this is a helpful post! I have a lot to learn as I begin my photography adventure, and tips from pros like you are great. Thanks!
Lyndsay, you rock!!
SO helpful! I always wondered how everyone gets their feet way up by their cheeks like that!
@MC – LOL!!!!!!!!
First of all, love the shots. Second, THANK YOU for posting a ‘behind the scenes/how to’. I just take photos of my own kids, but am always trying to learn to be better. I really appreciate you taking time to do something like this.
Man, I LOVE LOVE LOVE it when you post the how-to’s! I would love to have all the baby photography tips you can dish up! I think they are my least favorite session type because I feel like I’m taking too long. I always feel rushed like I’m taking up too much of the parents time, which causes me to forget stuff I wanted to do. I always get home and am so frustrated!!!
OH! Just one more question. I would love to know where you find all the great props you use for babies. Do you order it all through Etsy or make it yourself. I love the throw you used here and the basket!!! Please share – I really need help!
This was ENORMOUSLY helpful! Thank you! Thank you!
I’m not a professional photographer but I still love to read things like this. It’s very interesting to see how photographers set up. Thanks for sharing!
Incredibly helpful. Thanks so much. Now I just need to go work on having another newborn so I can take better photos 🙂
I can’t speak for anyone else (but it doesn’t look like I need too! You’ve got lots of great comments!), however, I really love seeing mini-tutorials like this. It’s a huge help!
MC, HUGE congrats, he’s adorable!! Lyndsay, your set up and info are priceless as usual, thanks so much for sharing. Amazing shots!!!
SO incredibly helpful! loved this post….simply beautiful!
Thanks for sharing, Lyndsay. Beautiful photos, love those toes! *start with the feet* ..I’m going to try that next time! 🙂
Oh I LOVE when you share things like this with us!!!! I am so grateful for all of your help. You are such an inspiration! Thank you:)
I love to hear your thought process from shoot to product. Thanks!
love your work! appreciate anything you offer. I am self talk hobby photographer who has been asked more and more to do work, so, I am spending lots of time researching. Thanks for your help. Would love to see the photos and set up for Jack at sunset.
You did not post this in vain! It’s been over a year since you posted these tips and I am benefiting from it. Thank you so much!!
Brilliant thank you